Service Interconnection Fabric Deployment
A full Bayware system utilizes an orchestrator, processors, and agents. The
processors in your system work together to form a service interconnection
fabric between your application microservices. For this tutorial, you will go
through the steps to turn four of your VMs into
processors: aws-p1 and aws-p2 in AWS; azr-p1 in Azure; and
gcp-p1 in GCP. But to be clear–and recalling the importance of policy
enforcement in your deployments–installing a service interconnection fabric
presents a zero-trust network in which no communication is allowed between your
microservices until contracts are explicitly put in place.
Before we begin, let’s use the orchestrator to show that no processors (and no agents) currently exist in your network. To do this, go back to the browser window in which you logged into the orchestrator. In the navigation bar on the left, find the Topology button under the Admin heading as shown in Fig. 9.
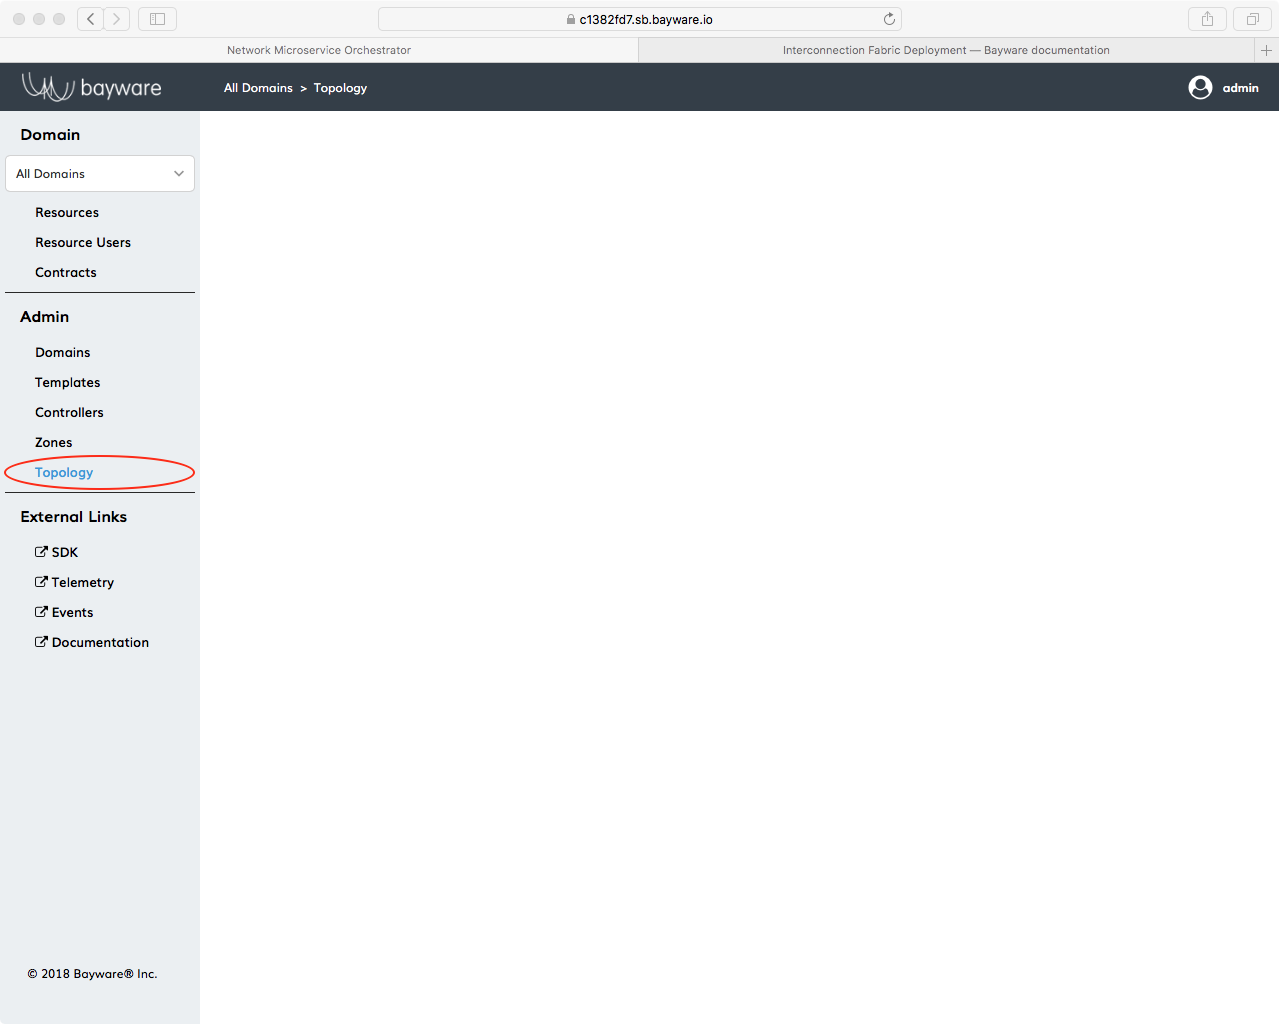
Fig. 9 Empty Orchestrator Topology
Click Topology. The pane on the right should be empty. Later, you will see that processors appear as large circles in this pane.
The subsequent commands can be broken up into
- Login to a processor VM’s OS
- Install Bayware’s engine and Open vSwitch
- Configure the engine
- Repeat steps 1 - 3 for each processor VM
- Create links between processors
Step 1: SSH to VM
Let’s begin with aws-p1. From the command-line prompt on your CCC, login
]$ ssh centos@aws-p1
You will not need a password since a public key has already been installed on aws-p1.
You should now have a prompt on aws-p1 that looks similar to
[centos@aws-p1-382fd7 ~]$
The following commands require super-user privileges, so become root
[centos@aws-p1-382fd7 ~]$ sudo su -
which should give you a prompt like
[root@aws-p1-382fd7 ~]#
The root prompt will be abbreviated in the description below to ]#.
Step 2: Install Bayware’s engine and Open vSwitch
Each processor node in a service interconnection fabric is comprised of two
pieces: an engine that determines intent and a data path that moves traffic.
The engine, part of Bayware’s core technology, is an Erlang- and C-based
application available from the bayware-repo. The data path for this
particular implementation utilizes the open-source application, Open vSwitch.
The bayware-repo and the epel-release repo, both required for
these applications, have been preinstalled on your virtual machines.
Now install the engine and Open vSwitch on aws-p1
]# yum install ib_engine openvswitch -y
Step 3: Configure the engine
Now you will configure the engine so that it becomes visible to the
orchestrator. For security purposes, each engine in the network may have its
own login credentials. And that’s how this tutorial has been configured. In
your SIS page, locate the table with Bayware
Processor login credentials (overall, table rows 19
- 22). Note the domain, username, and password associated with the
first processor (row 19) as you’ll need it in the next step.
To configure the engine, cd to the directory that contains the
configuration script, /opt/ib_engine/bin.
]# cd /opt/ib_engine/bin
The script is called ib_configure. You can display the usage instructions by typing
]# ./ib_configure -h
You will run the script now in interactive mode. The script will prompt you to enter the following information
- orchestrator IP or FQDN: use
c1382fd7.sb.bayware.ioas shown in the URL table at the top of the SIS. Your FQDN prefix will be different thanc1382fd7shown here. Do not include thehttps://that is present in the URL.- node
domain: use the domain from login credentials, row 19- node
username: use the username for this engine from login credentials, row 19- node
password: use the password for this engine from login credentials, row 19- configure IPsec: answer
YES
Begin the interactive script now by entering the following at your prompt
]# ./ib_configure -i
After you work your way through the script and it does its magic, the engine
will be configured, but it won’t be running. Since the engine is controlled
by Linux systemd, you should start and enable it with the following
]# systemctl start ib_engine
]# systemctl enable ib_engine
The aws-p1 node should now be registered as a processor on the orchestrator.
To see this, once again go to the orchestrator tab open in your browser and
click Topology.
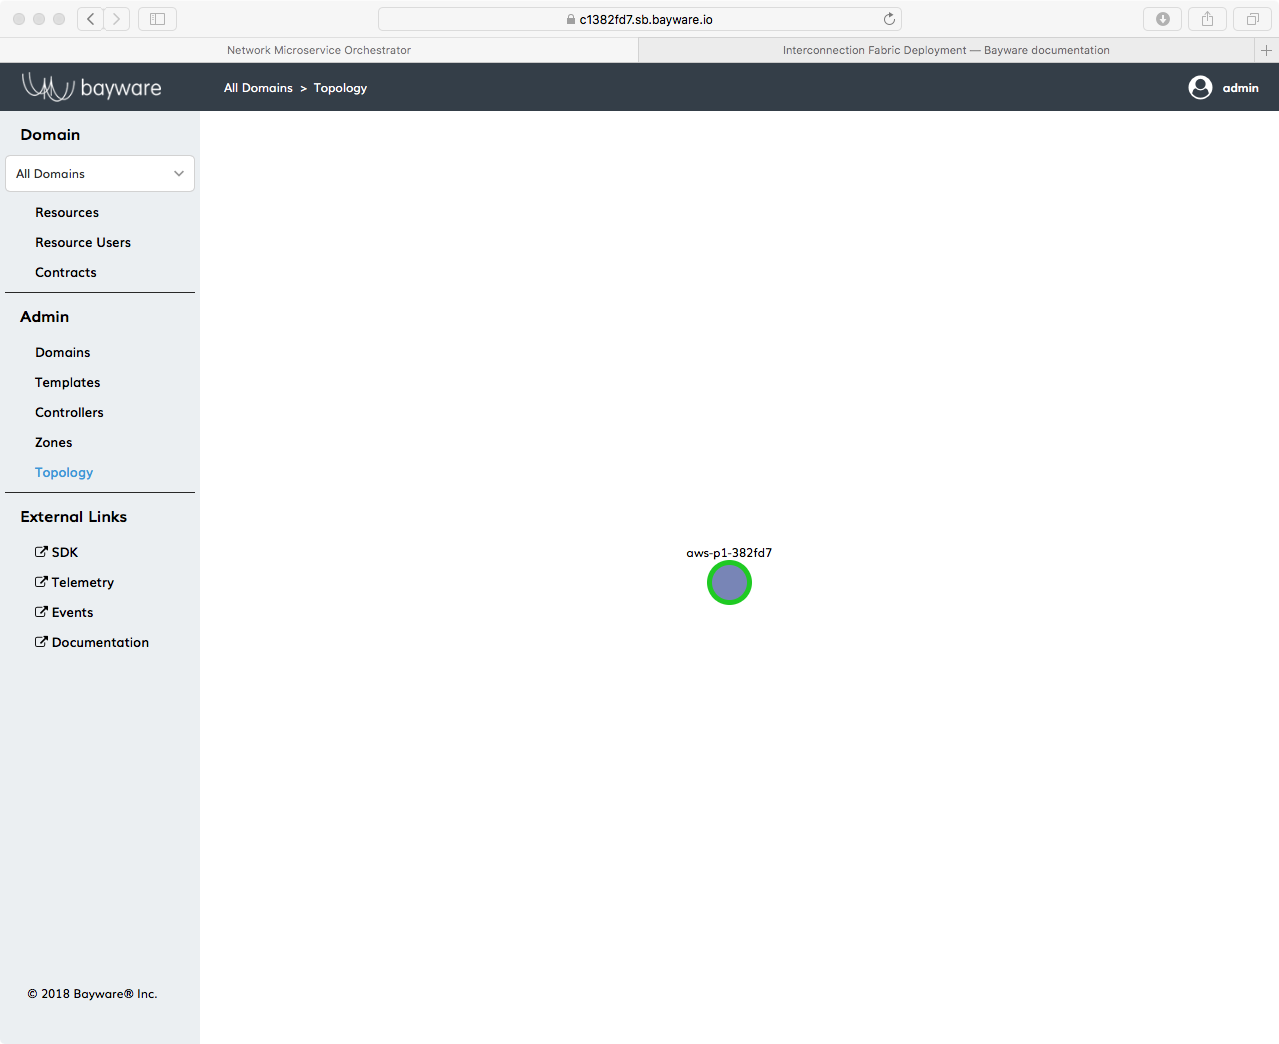
Fig. 10 Bayware Processor Installed on aws-11
You should see a green circle with the node name of this processor next to it as shown in Fig. 10. You can also see this registered resource by clicking on the orchestrator’s Resources button located near the top of the left-side navigation bar.
Step 4: Repeat steps 1 - 3 for each processor VM
Now that you have successfully installed one processor, repeat steps 1 through 3 above with the three remaining Proc VMs and processor login credentials listed in your SIS. When you’re finished, the four Bayware processors should be running on VMs as shown in the table below.
| VM | Processor Login Username |
|---|---|
| aws-p1 | proc-1 |
| aws-p2 | proc-2 |
| azr-p1 | proc-3 |
| gcp-p1 | proc-4 |
You can do this by logging out of aws-p1 in the terminal window you used
above by exiting from root and then exiting from the VM altogether by
typing
]# exit
]$ exit
which should get you back to your CCC VM and its prompt
[centos@aws-bastion-382fd7 ~]$
For the quick studies among you, the essential commands have been reproduced in the CHEAT SHEET - PROC INSTALL with a few hints about what goes where. If you’re comfortable with the whys of all this typing, the cheat sheet simply saves a little scrolling. Otherwise, feel free to go back through each of the steps in detail.
CHEAT SHEET - PROC INSTALL

]$ ssh centos@aws-p2                     hint: [ aws-p2, azr-p1, gcp-p1 ]
]$ sudo su -
]# yum install ib_engine openvswitch -y
]# cd /opt/ib_engine/bin
]# ./ib_configure -i                     hint: [ proc-2, proc-3, proc-4 ]
]# systemctl start ib_engine
]# systemctl enable ib_engine
]# exit
]$ exit
Once all four engines are installed, return to the orchestrator Topology page and Resources page to ensure everything went smoothly. You should see that the orchestrator has recognized four processors as shown in Fig. 11.
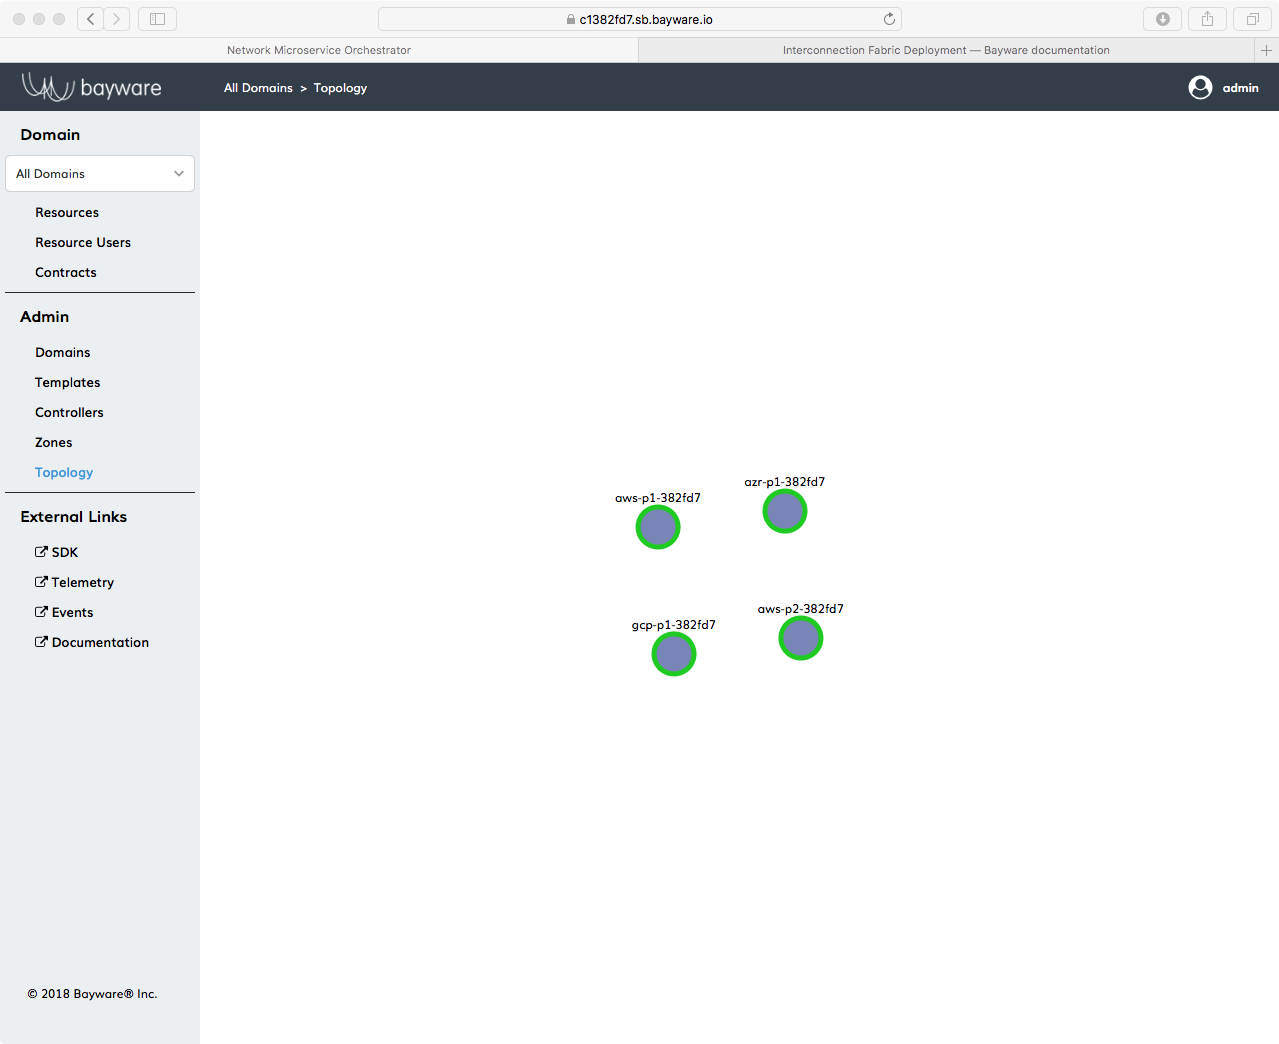
Fig. 11 Four Processors on the Orchestrator Topology Page
After that, you’re ready to move on to creating a full mesh between your processor nodes.
Step 5: Create links between processor
Your service interconnection fabric, currently, consists only of processors with no knowledge of each other nor the ability to communicate with each other. To set up links between the processors that allow communication, you’ll work with the orchestrator.
On the browser tab with the orchestrator, click on Resources in the left-side navigation bar.
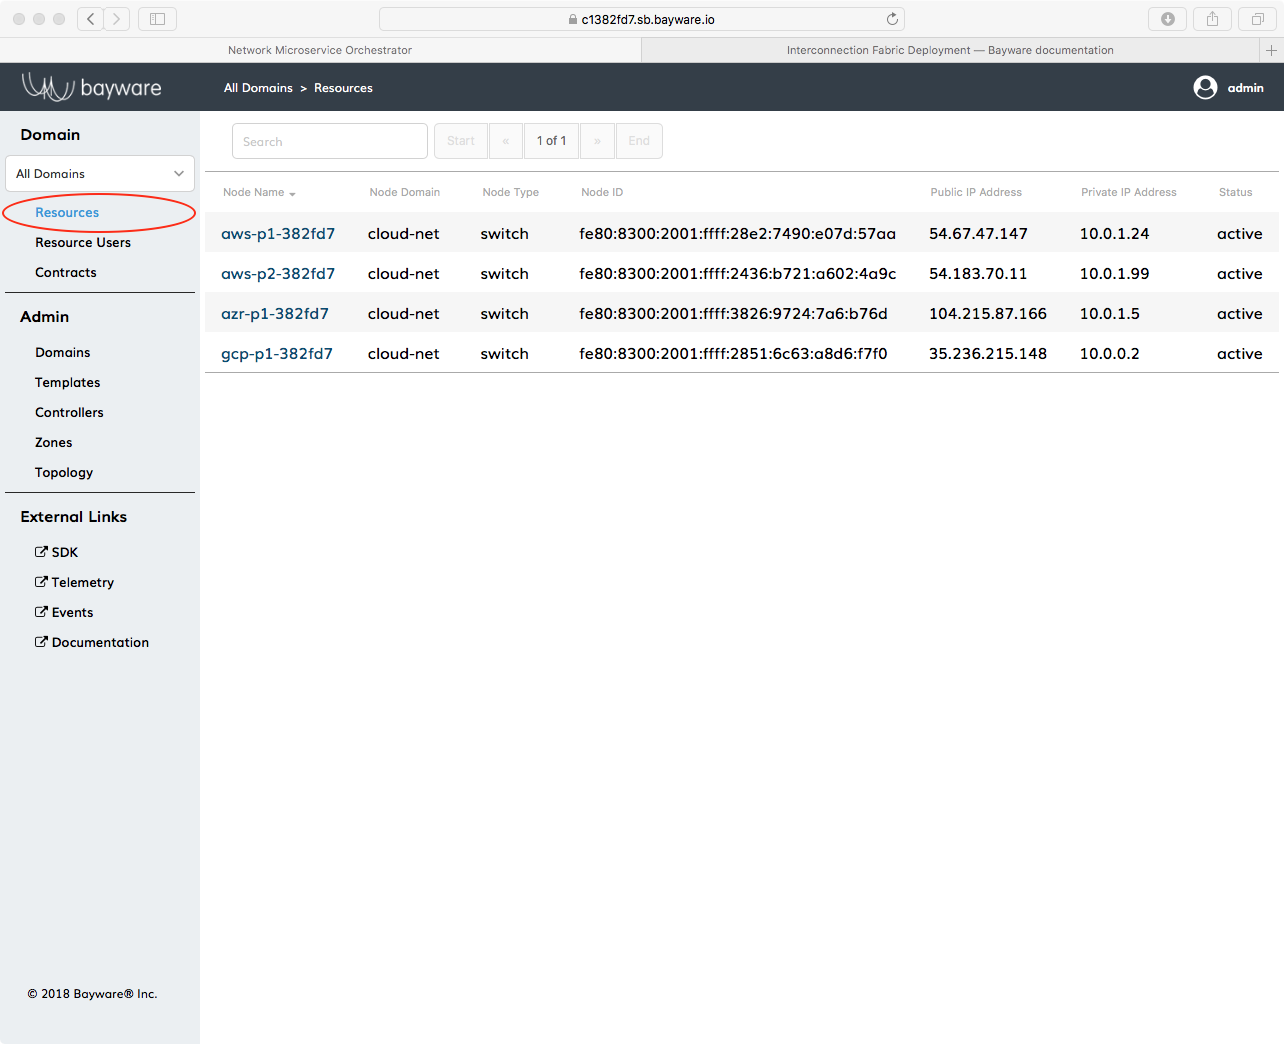
Fig. 12 Bayware Orchestrator Resources Button
Find the Node Name of your first processor node in the first column in the
right pane. You’re looking for aws-p1-382fd7. Click it.
You should see the Resources page for node name aws-p1-382fd7.
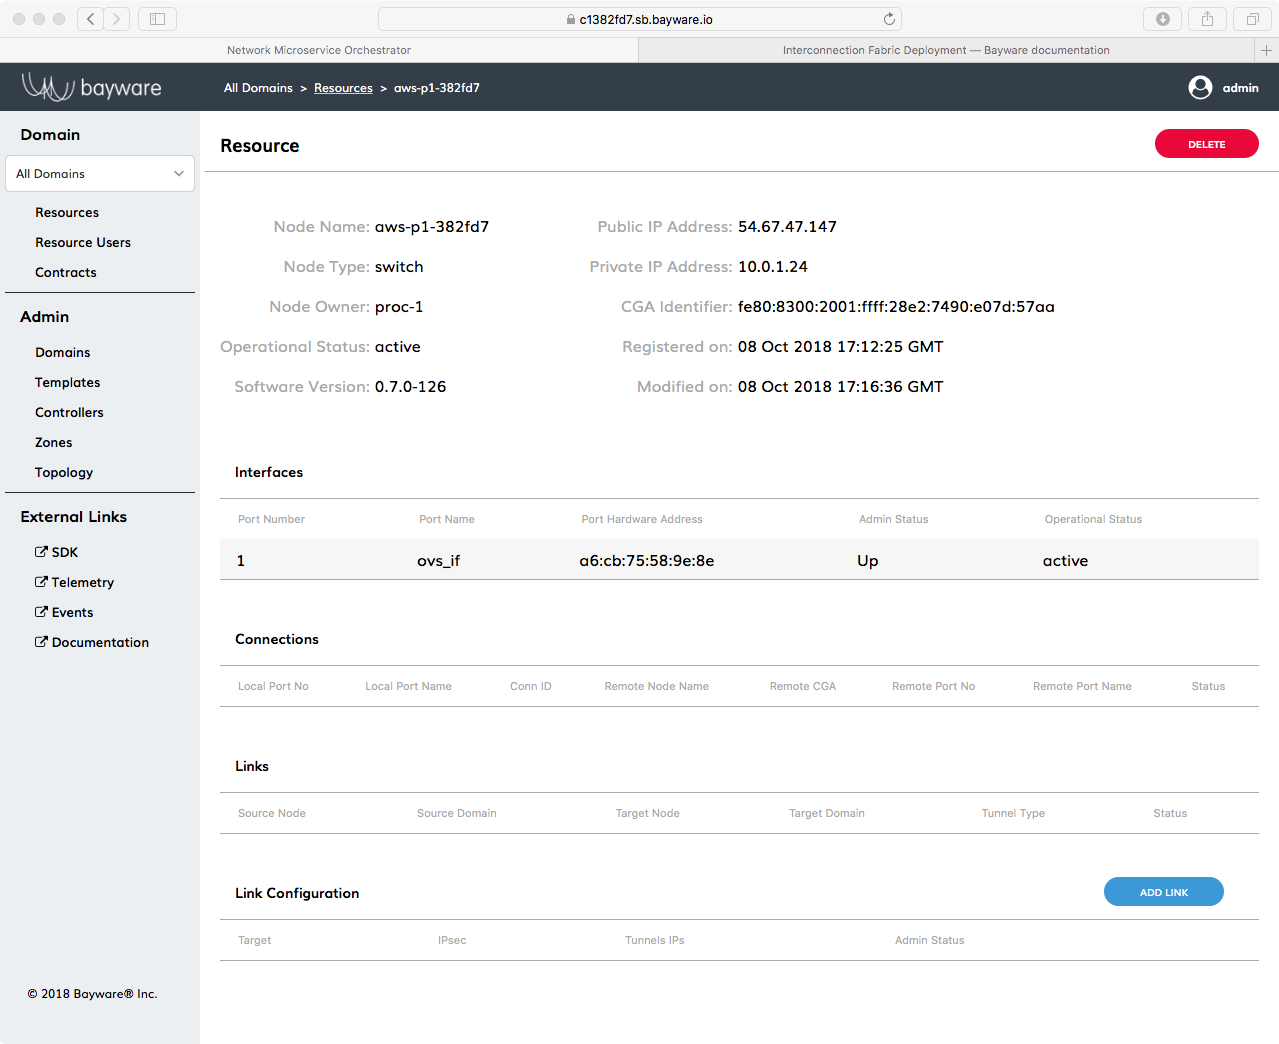
Fig. 13 Resources Page For aws-p1-382fd7
Scroll to the bottom of the page and click Add Link.
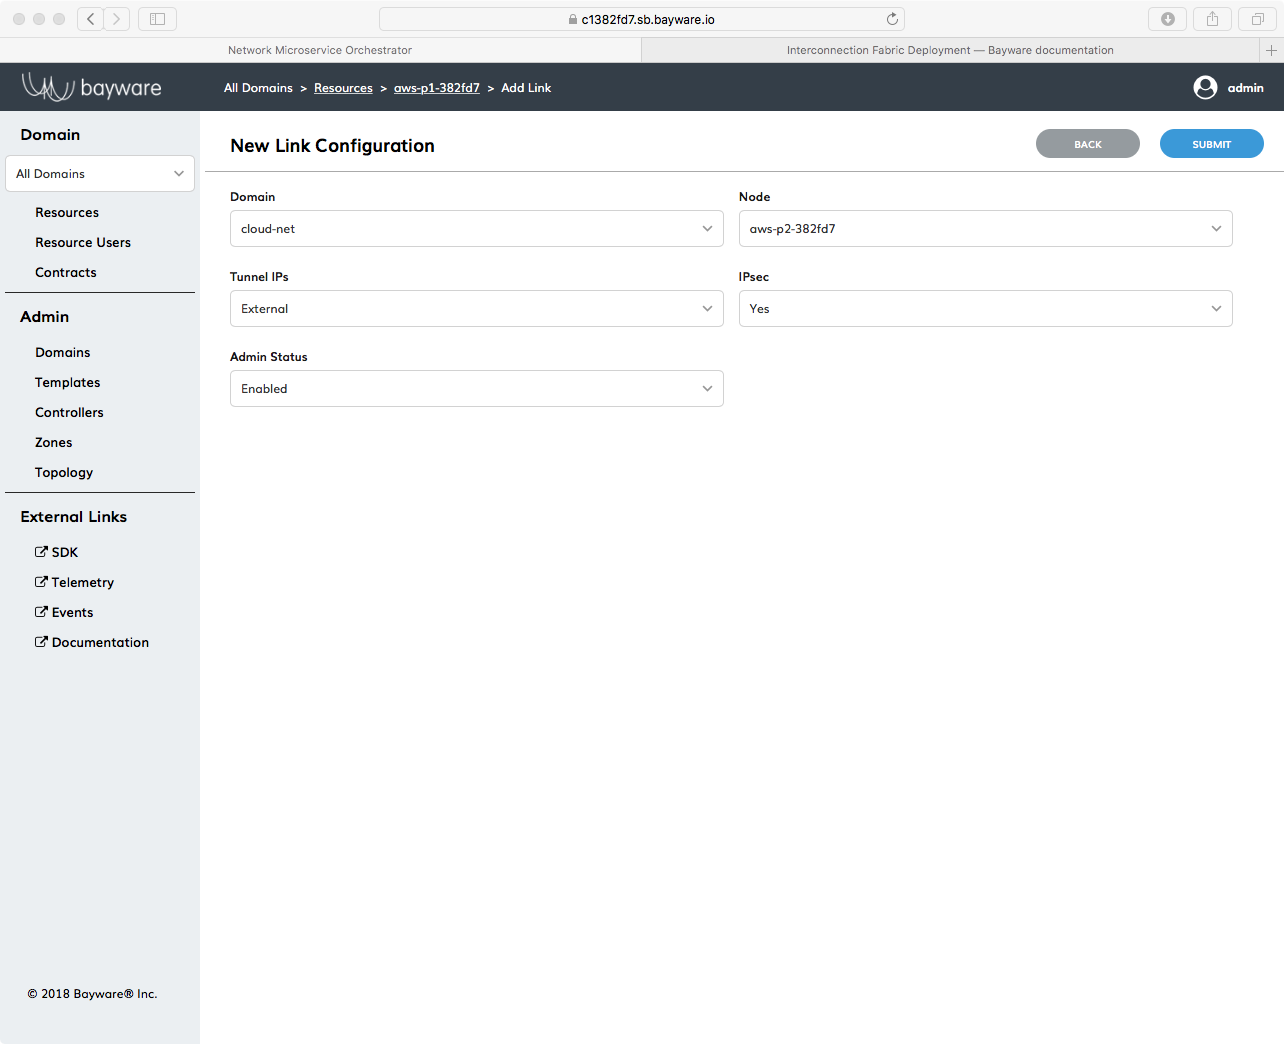
Fig. 14 Link Configuration Page For aws-p1-382fd7
Fill in the fields as follows (recalling you will have a different 382fd7 suffix):
- Domain =
cloud-net- Node =
aws-p2-382fd7- Tunnel IPs =
External- IPsec =
Yes- Admin Status =
Enabled
Now click Submit in the upper right. You should briefly see a
Success message and then be directed back to the Resources page for
aws-p1-382fd7. Scroll back to the bottom of the page. There should be a
Link Configuration entry for aws-p2-382fd7.
While you’re on the Resources page for aws-p1-382fd7, go ahead and add two
more links, just as you did above, except using Node Names gcp-p1-382fd7 for
one link and azr-p1-328fd7 for the other link.
When you’ve finished, you should see three entries under Link Configuration for
aws-p1-382fd7.
Now that three of the six links have been added, there are three more to add.
Click again on Resources in the left-side navigation bar. Find
aws-p2-382fd7 and select it. Scroll to the bottom as before and add
two links: one between aws-p2-382fd7 and azr-p1-382fd7 and
another between aws-p2-382fd7 and gcp-p1-382fd7.
When you’ve finished, you should see three entries under Link Configuration
for aws-p2-382fd7: the link originally created from the aws-p1-382fd7`
Resources page and the other two links you just created.
Five down, one to go…
Finally, for a full-mesh interconnect, you need to create a link between
gcp-p1-382fd7 and azr-p1-382fd7`. You can do this from the
Resources page of either node by following the previous examples.
When you’re finished, navigate back to the Topology page of the orchestrator. Now you should see your interconnection network with its four nodes and six links. Note that it may take up to a minute for links to appear between the processor nodes.

Fig. 15 Orchestrator Topology Showing Nodes and Interconnection Links
For yet more proof that something good has happened, go to the Resources page for one of the processors using the Resources link in the left-side navigation bar.
Tip
You can also find the Resources page for a specific processor by clicking on that processor in the Topology page and then clicking its Node Name that appears in the information overlay in the upper-right corner.
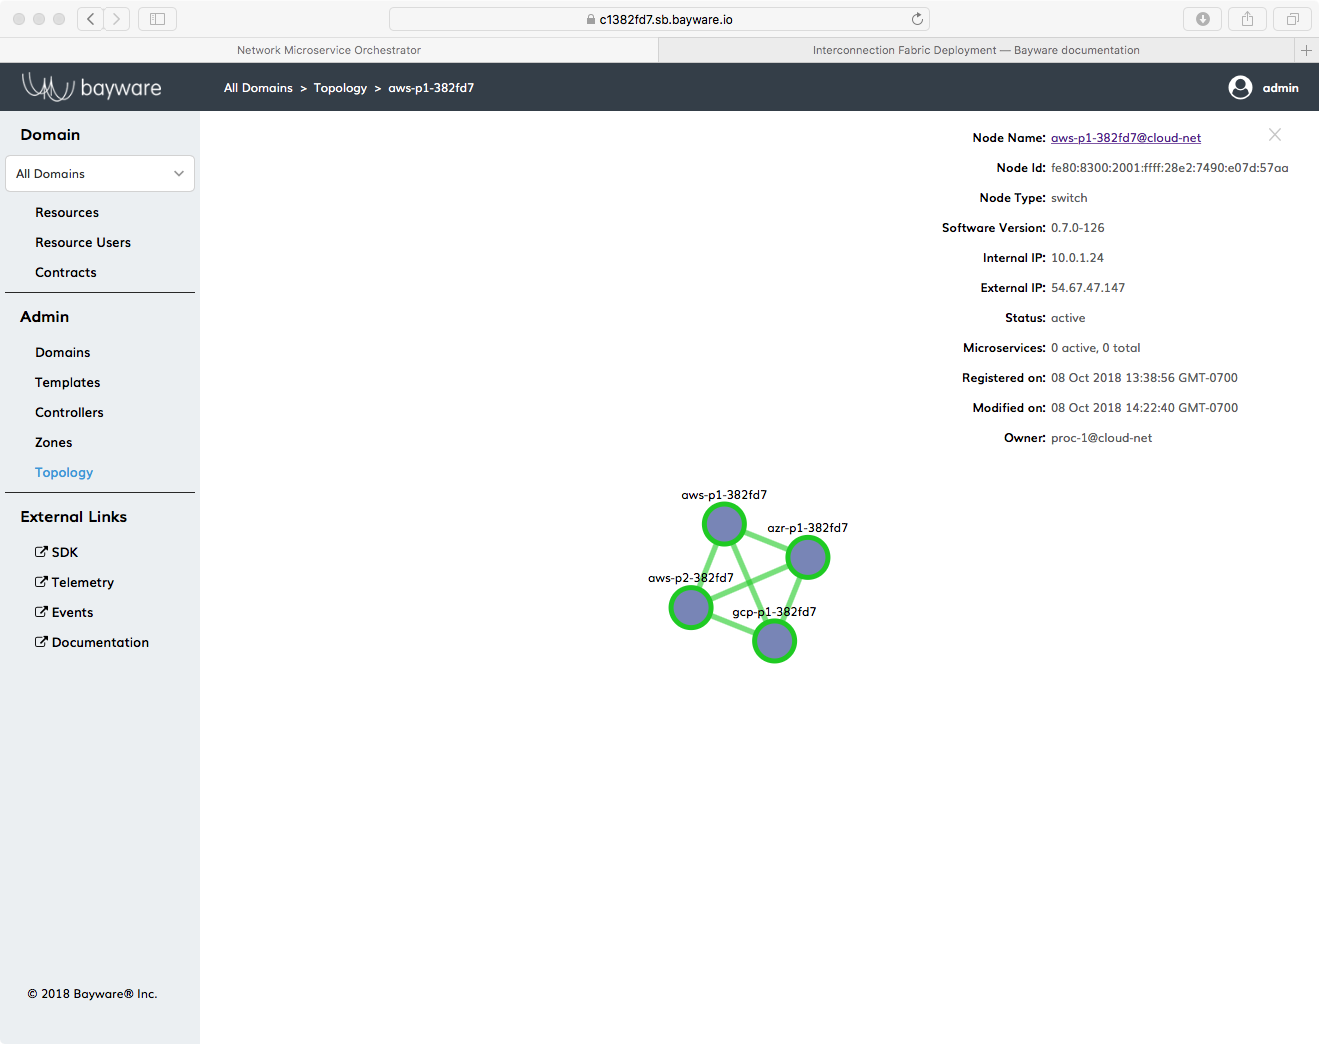
Fig. 16 Orchestrator Topology Showing Node Information Overlay
Once back on one of the Resources page of one of your processors, you’ll note that in addition to the Link Configuration information at the bottom, now you should also see three entries each under Links and Connections.
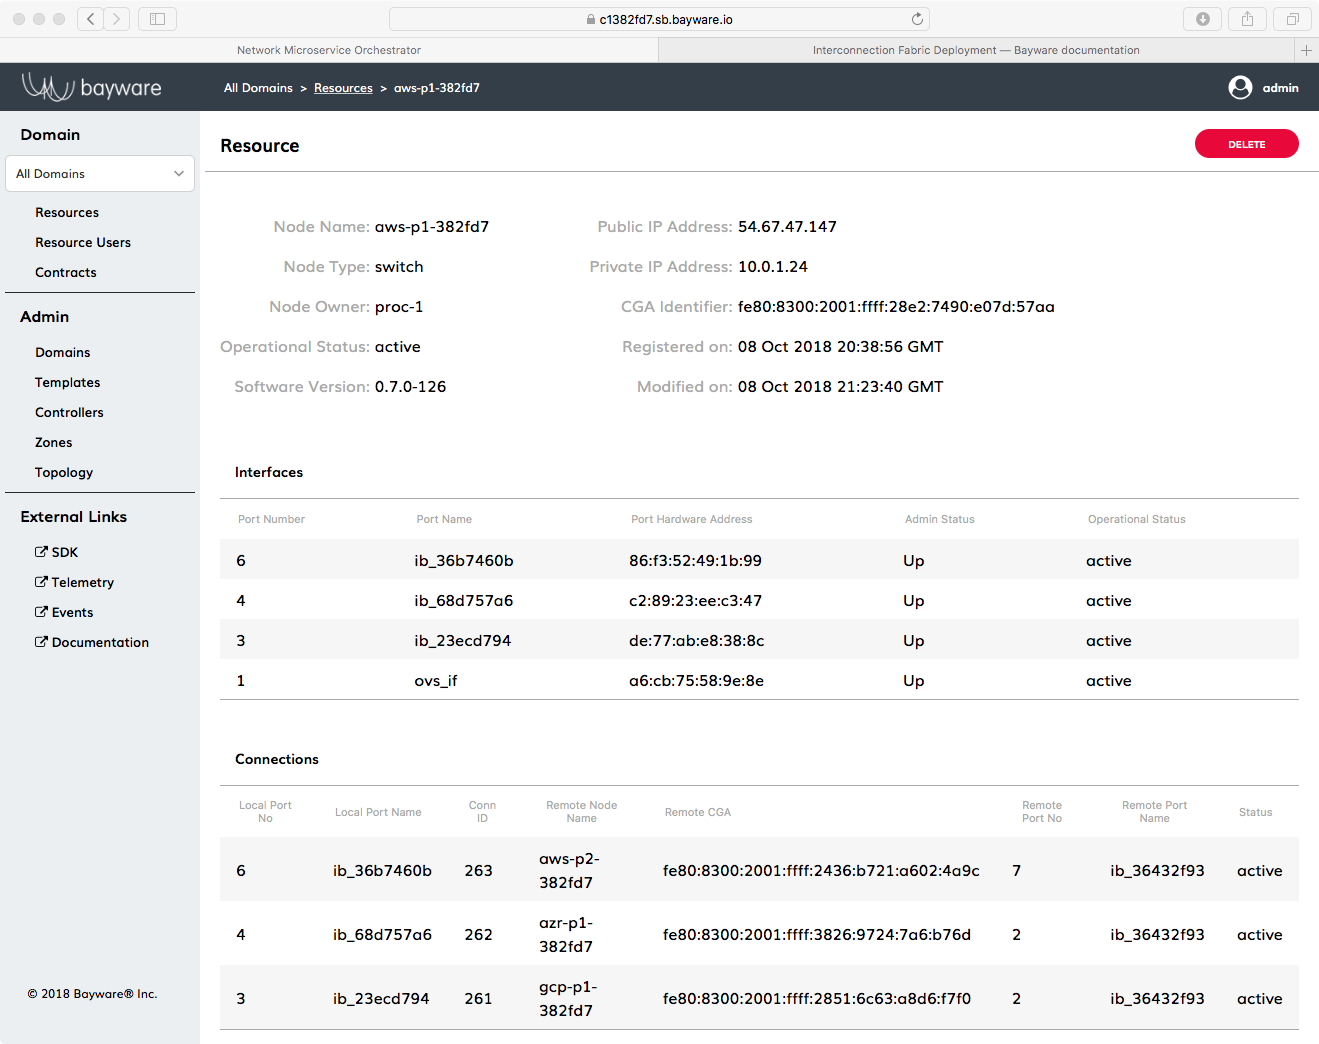
Fig. 17 Node Resources Links & Connections
Summary
In this chapter you installed Bayware processors and Open vSwitch on four VMs in your infrastructure. You used the orchestrator Topology and Resources buttons extensively to monitor the installation processor. You finally created a full-mesh between all four processor nodes with a few simple clicks on the orchestrator.
Next up: install your first application, Getaway App…