Application Deployment
This document describes the management functions necessary for deploying of application services with the BWCTL-API command-line tool or via a web interface.
To deploy application services, all you need to do is generate one or multiple
tokens for each application service and place these tokens on workload nodes.
The token will automatically enable secure communication for the application
service hosted by the node, in strict accordance with the service roles (see
the Create Service Graph > Authorize Service section for details).
The steps below will guide you through the token generation and deployment process.
Generate Token
An application service requires at least one token to communicate with other services. You can generate a number of tokens to provide each service instance with its own token.
Using Web Interface
To generate a new token for an application service, click Add Token on the
service page in the myApp > Services section–in this example http-proxy.

Fig. 159 Add New Token
Fill out the fields in the Token pop-up window:
- token expire period in days
- token validity duration.
Note
Starting with family version 1.4, the token scope can be restricted to a given workload or workload location.
Submit the new token configuration. You should see the token identifier and value appear in the next pop-up window.
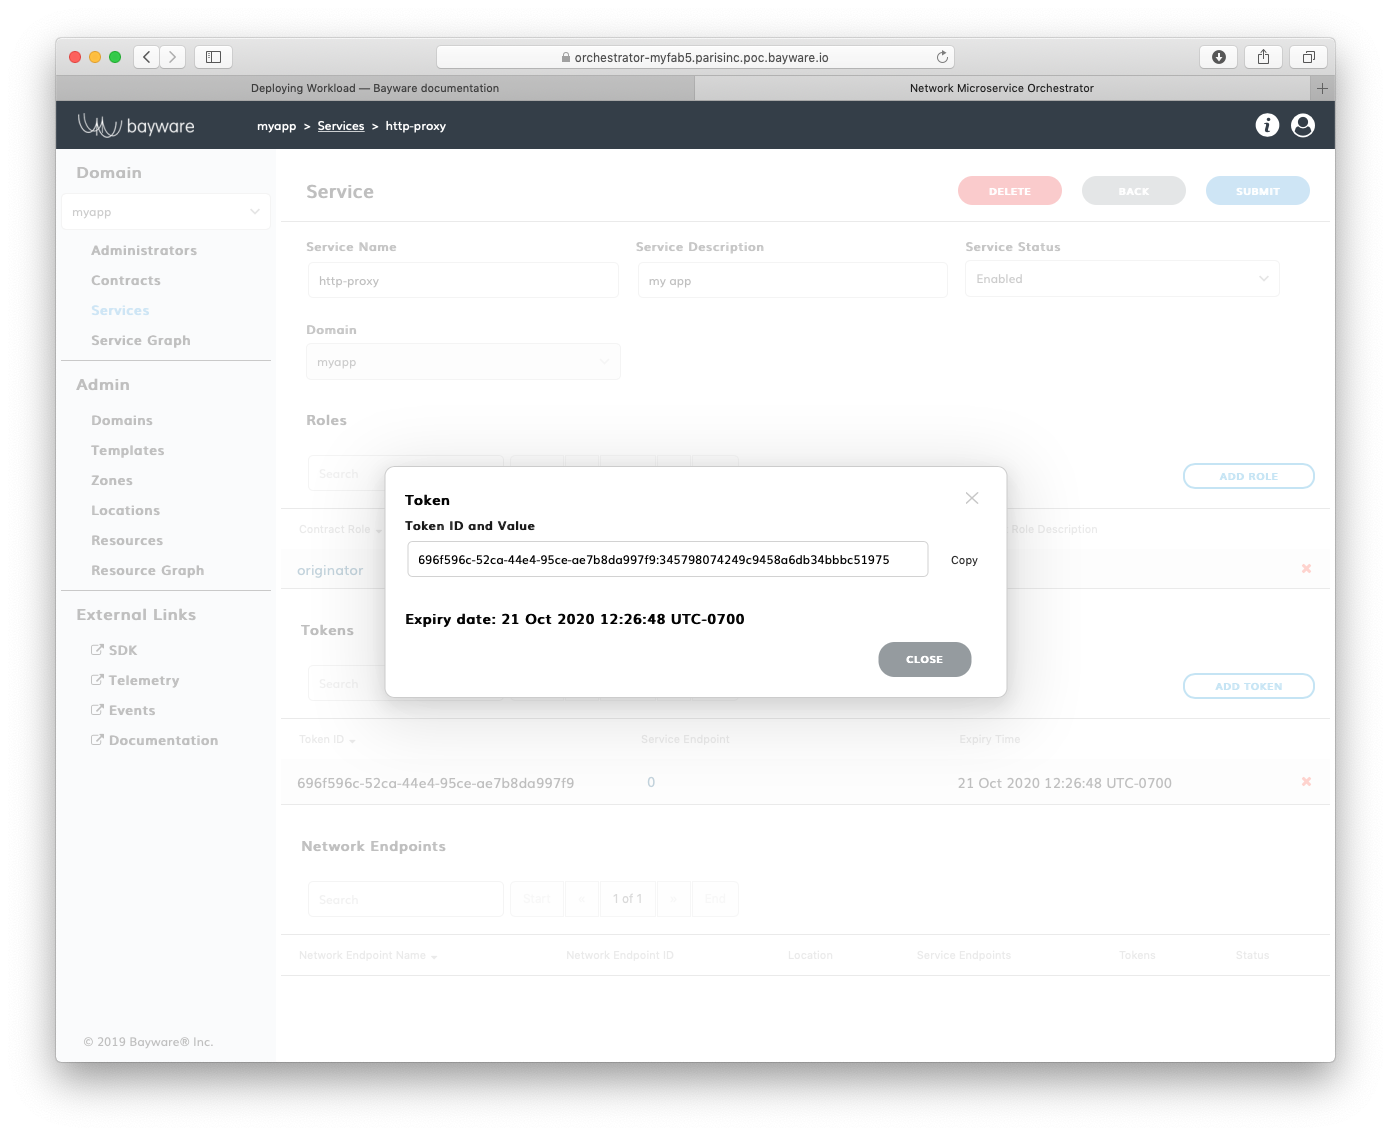
Fig. 160 Token ID and Value
Warning
Token comprises two parts–token identity and token secret–separated by a colon. This is the only time you can see the token secret. Be sure to copy the entire TOKEN as it appears on your screen, it will be needed later.
After you copied your new token, close the pop-up window. You should see the
token identifier and expiry time appear in the Tokens list on the application
service page–in this example http-proxy@myApp.
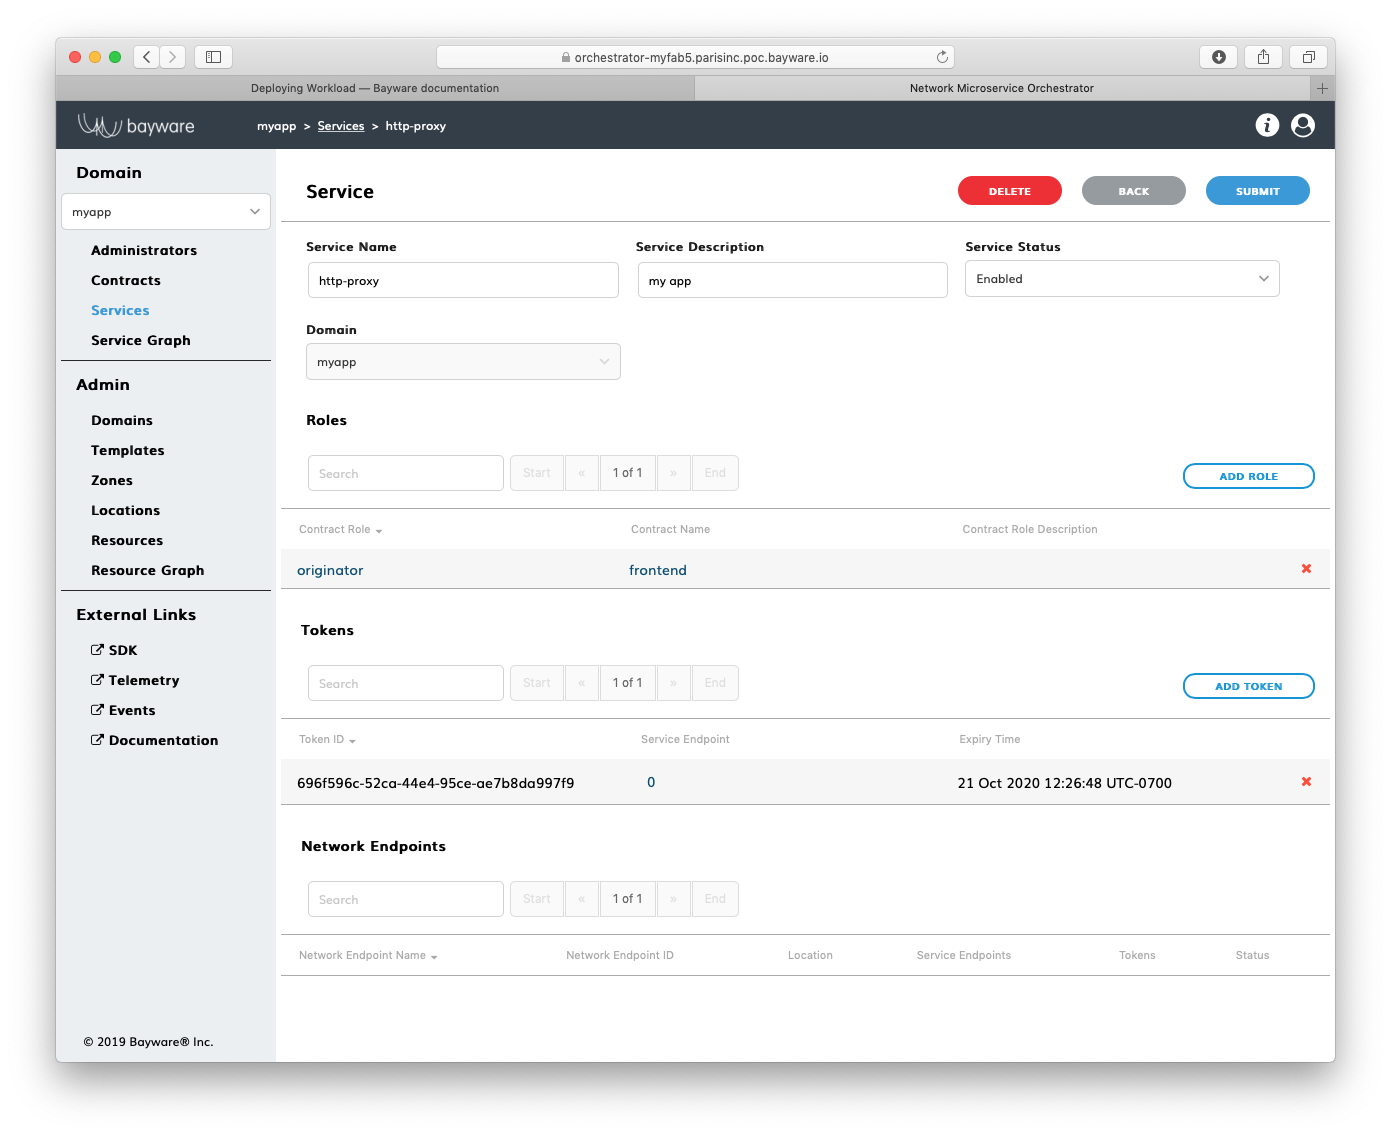
Fig. 161 List of Tokens
Using BWCTL-API
To generate a new authorization token for your application service, run this
command using service_name@contract_name –in this example http-proxy@myapp –as an
argument:
]$ bwctl-api create service_token http-proxy@myapp
You should see output similar to this:
---
apiVersion: policy.bayware.io/v1
kind: ServiceToken
metadata:
  token_ident: 76686212-f14e-4919-aabc-bcd6b09e28dc:ee0760eb054ffd95e290e6ef2bbf7739
spec:
  domain: myapp
  expiry_time: 22 Oct 2020 19:40:49 GMT
  service: http-proxy
  status: Active
Warning
Again, the Token comprises two parts–token identity and token secret–separated by a colon. This is the only time you can see the token secret. Be sure to copy the entire TOKEN as it appears on your screen, it will be needed later.
Deploy Service
To deploy an application service on a workload node, you need to provide the node policy agent with a service authorization token.
Note
To discover a remote service, your application service must use the remote service FQDN from the contract.
The steps below will guide you how to pass a token to the policy agent and set up a remote service FQDN for the application service.
SSH to Workload Node
To start deploying a service on a workload, first ssh to the workload from your
fabric manager using the workload name–in this example azr2-w01-myfab5:
]$ ssh azr2-w01-myfab5
Note
The fabric manager SSH service is set up automatically for easy and secure access to any node in your service interconnection fabric.
When you are on the workload node, switch to root level access:
[ubuntu@azr2-w01-myfab5]$ sudo su -
Add Token
Next, edit the policy agent token file by running this command:
[ubuntu@azr2-w01-myfab5]# nano /opt/bayware/ib-agent/conf/tokens.dat
Add the token to the tokens.dat file and save the file, which in this example
will contain after editing:
76686212-f14e-4919-aabc-bcd6b09e28dc:ee0760eb054ffd95e290e6ef2bbf7739
To apply the token, reload the policy agent by running this command:
[ubuntu@azr2-w01-myfab5]# systemctl reload ib-agent
At this point, you can visit the policy orchestrator and find a registered
endpoint on the Service Graph page of your application.
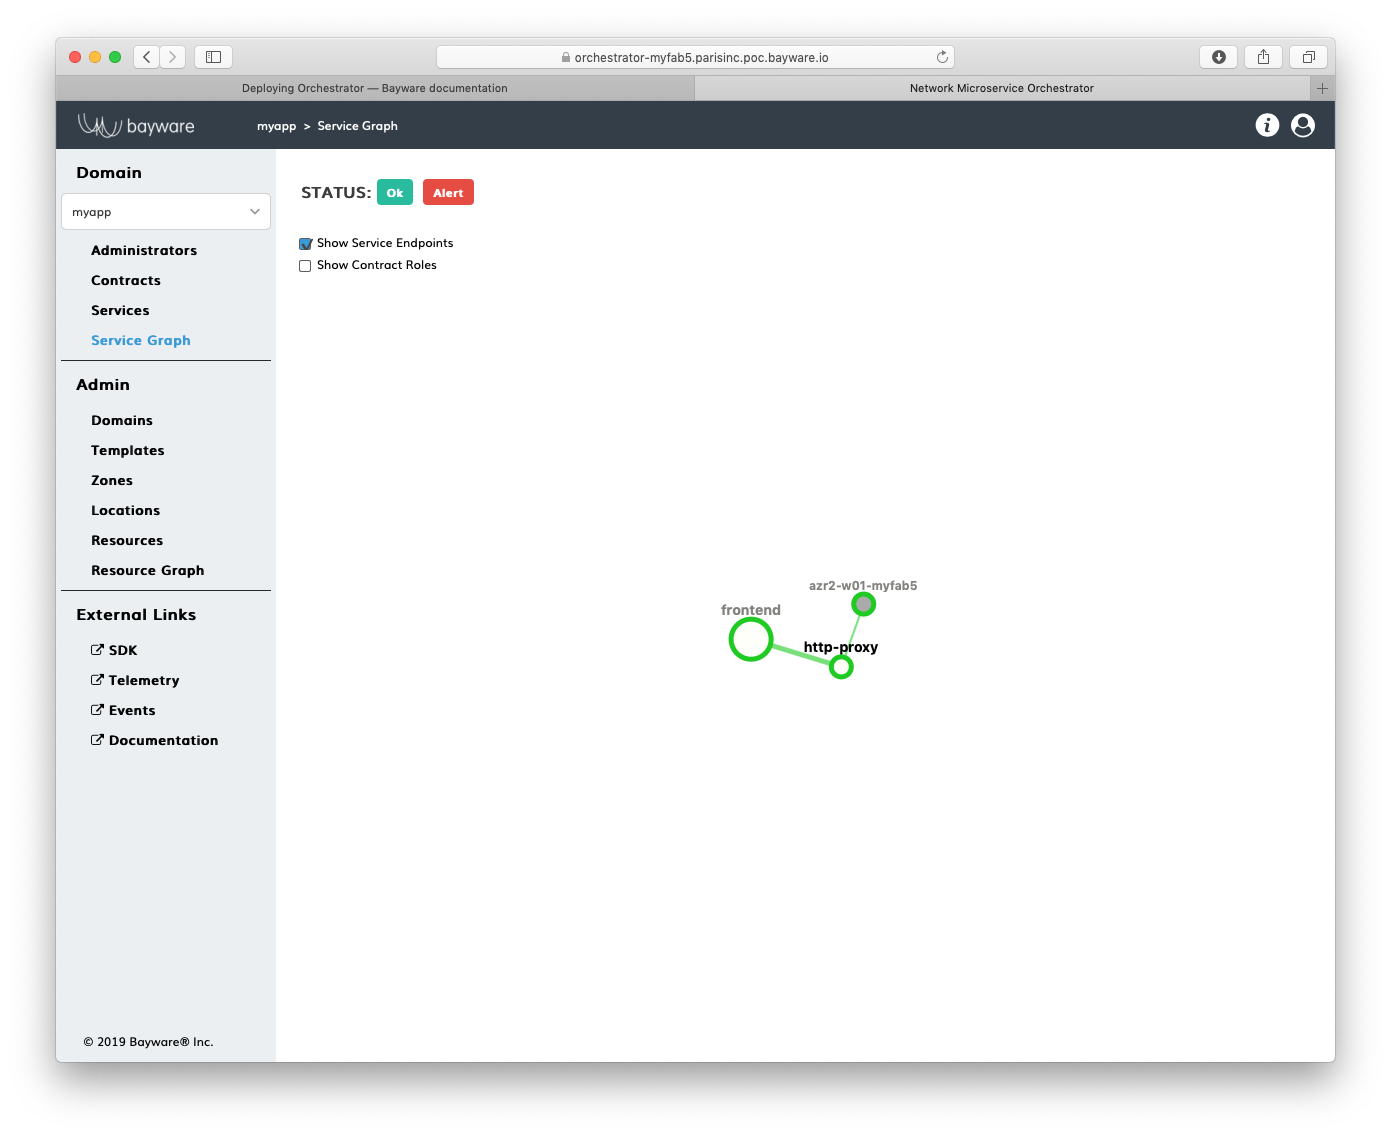
Fig. 162 Service Graph with Registered Service Endpoint
Install Service
Now, you can install your application service on the workload node. In this
example, a package called getaway-proxy installs by running this command:
[ubuntu@azr2-w01-myfab5]# apt-get install getaway-proxy
The service automatically discovers all remote services sharing the same contract. To enable it, update the application service configuration file with the remote service FQDN by running this command:
[ubuntu@azr2-w01-myfab5]# nano /opt/getaway-proxy/conf/app.conf
After editing, the service configuration file in this example contains:
WS_APP = 'http://responder.frontend.myapp.ib.loc:8080/'
Note
The remote service FQDN is automatically built using this notation: <role>.<contract>.<domain>.<hosted_zone>, wherein the default hosted zone is ib.loc
Note
You can always change the FQDN parts: hosted_zone in the policy agent configuration and role.contract.domain in contract settings.
To start the application service, run this command:
[ubuntu@azr2-w01-myfab5]# systemctl start getaway-proxy
Note
As soon as an instance of the remote service responder.frontend.myapp. is deployed in the fabric, it will be automatically discovered, and getaway-proxy will be able to reach it.
Working with Batches
You can generate tokens in batches and use the batch command output in your application CI/CD pipeline to deploy a number of new services or their instances or to rotate tokens.
Create a token request file on the fabric manager node–for example myapp-tokens.yml:
]$ nano myapp-tokens.yml
After editing, this example of the batch file contains:
---
apiVersion: policy.bayware.io/v1
kind: Batch
metadata:
  name: batch file for generating 6 tokens
spec:
- kind: Token
  metadata:
      name: aws-proxy
  spec:
      service: http-proxy
      domain: myapp
- kind: Token
  metadata:
      name: aws-svc
  spec:
      service: getaway-svc
      domain: myapp
- kind: Token
  metadata:
      name: gcp-news
  spec:
      service: news-gw
      domain: myapp
- kind: Token
  metadata:
      name: gcp-places
  spec:
      service: places-gw
      domain: myapp
- kind: Token
  metadata:
      name: gcp-weather
  spec:
      service: weather-gw
      domain: myapp
- kind: Token
  metadata:
      name: azr-weather
  spec:
      service: weather-gw
      domain: myapp
Notice that the batch requests multiple tokens for the five services. One of
the services– weather-gw –runs both in GCP and in Azure. So the request contains
two tokens for each instance of weather-gw, totaling in six tokens for the five
services.
Note
By creating a unique token for each running service instance, you can control service authorization independently in each cloud or VPC. This will come in handy later on when you need to rotate or revoke service authorization in one cloud independently from others.
Now, execute the command to get the tokens from the orchestrator. Here you will redirect Linux stdout to a file where the tokens will be saved.
]$ bwctl-api create batch myapp-tokens.yml > tokens.yml
Once it has completed, use cat to explore the file containing the service tokens returned by the orchestrator.
]$ cat tokens.yml
The orchestrator has returned a YAML sequence of six tokens, each associated with a particular service within a given domain in a given cloud, as prescribed by the requesting YAML file.
---
- domain: myapp
  expiry_time: 23 Oct 2020 22:38:04 GMT
  name: aws-proxy
  service: http-proxy
  status: Active
  token: 84d93958-5ce3-4a03-97f8-b2783d62a3ca:83f2fcf74684d9bd88c952c4854ba9bf

- domain: myapp
  expiry_time: 23 Oct 2020 22:38:04 GMT
  name: aws-svc
  service: getaway-svc
  status: Active
  token: 4e29b3f0-7592-423f-bbcd-0a745af36cf7:e34122af6ab00c26e839796211b0f249

- domain: myapp
  expiry_time: 23 Oct 2020 22:38:04 GMT
  name: azr-news
  service: news-gw
  status: Active
  token: d5a4d58a-fddc-4e49-b48c-233a8dbc26bc:bf55693b5edf55061bf8637e7d65c3d2

- domain: myapp
  expiry_time: 23 Oct 2020 22:38:04 GMT
  name: azr-places
  service: places-gw
  status: Active
  token: 1ef1b997-144e-49a8-9985-4d04d06953e1:892864e7531c1cd0bcc8cf78232a0851

- domain: myapp
  expiry_time: 23 Oct 2020 22:38:05 GMT
  name: azr-weather
  service: weather-gw
  status: Active
  token: 204e36f4-4cdb-4d7a-b69b-529723d446d6:74427571e07536e43c6e59a650538675

- domain: myapp
  expiry_time: 23 Oct 2020 22:38:05 GMT
  name: gcp-weather
  service: weather-gw
  status: Active
  token: 720f45bf-b4d6-4664-b844-9f9a6fc681ac:90646deaeaf93223e1963c5445fb6c1a
Now, you can use this file in your application deployment pipeline to create service endpoints that get your application services up and running and communicating with each other.