BWCTL-API Command Line Interface
About BWCTL-API
BWCTL-API is a command line interface (CLI) tool that enables you to interact with the SIF Orchestrator using commands in your command-line shell. The tool offers all the functionality provided by the Orchestrator Graphical User Interface (GUI) as they both utilize the same Orchestrator’s RESTful Northbound Interface (NBI).
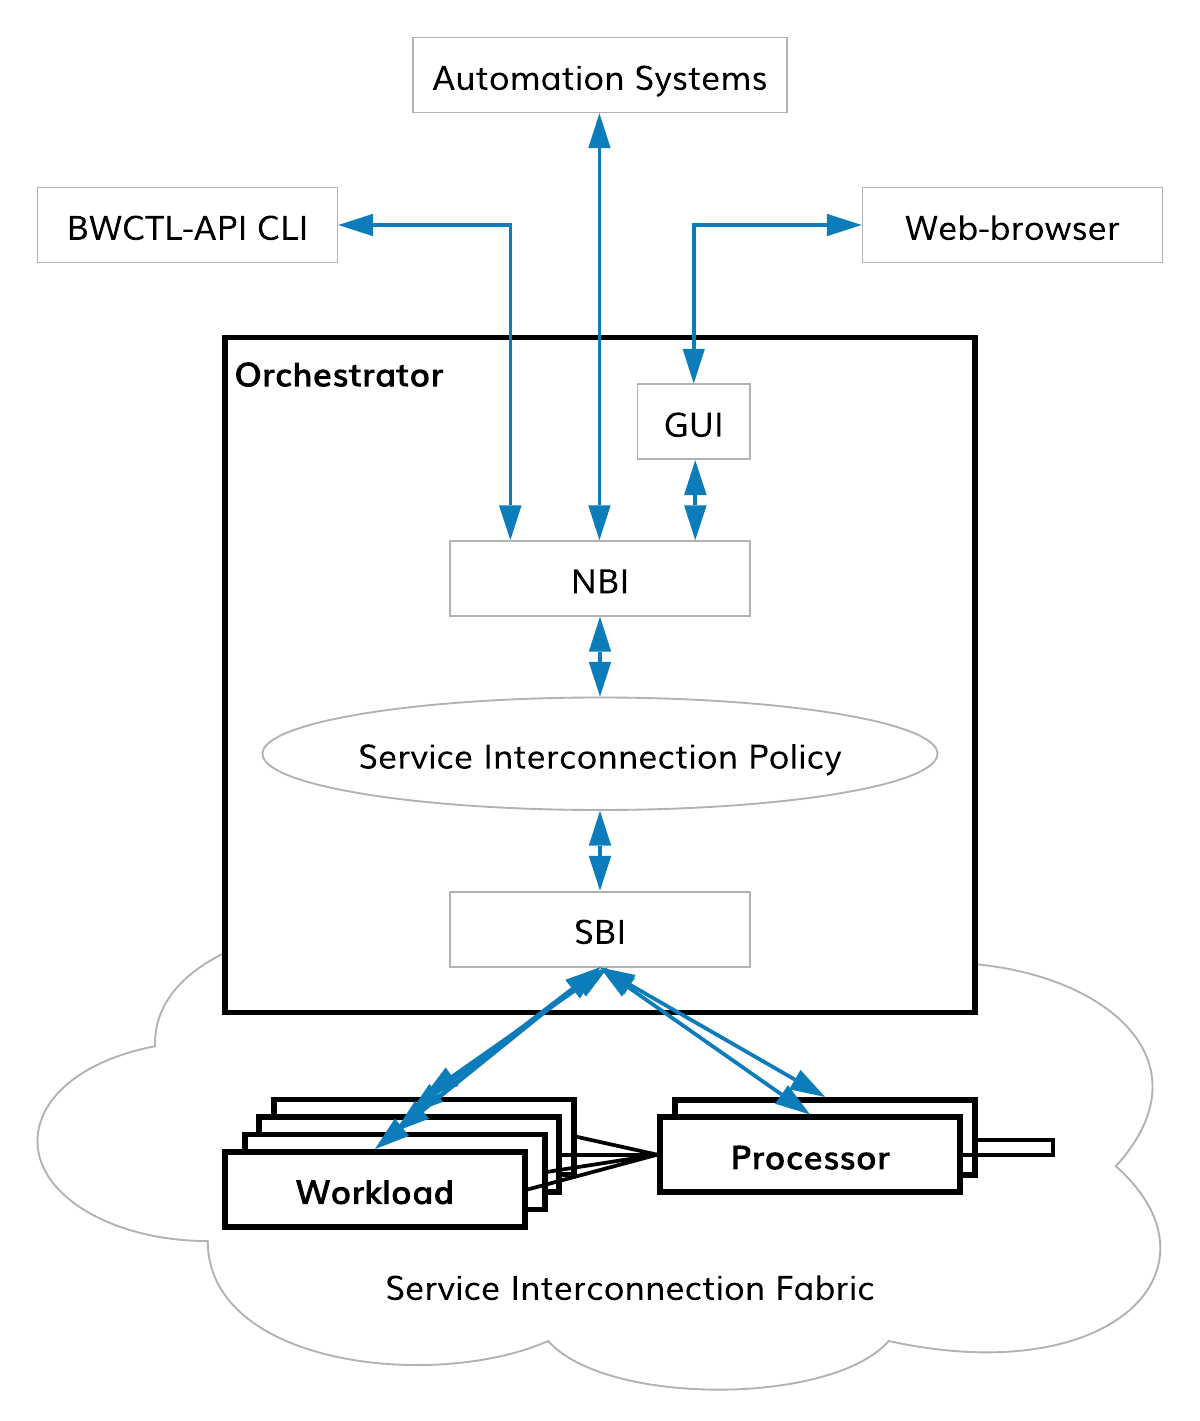
Fig. 163 BWCTL-API CLI for SIF policy management
In general, you can manage all policy entities in your service interconnection fabric using interchangeably one of the three tools:
- Browser-based GUI,
- BWCTL-API CLI,
- RESTful NBI.
To use BWCTL-API tool, you can install it on your local Linux machine or access remotely the tool already installed on your fabric manager node from any Linux, macOS, or Windows machine.
When the tool installed locally, use a common shell program, e.g. bash, to run BWCTL-API commands. To run the commands remotely, you will need a terminal window with an SSH client:
- MacOS – Use Terminal application with built-in SSH client.
- Linux – Use your favorite terminal window with built-in SSH client.
- Windows 10 – If you haven’t already enabled an SSH client to use with PowerShell, PuTTY is an easy alternative. PuTTY can act as both your terminal window and your SSH client.
BWCTL-API enables you to monitor policy entities and configure them. You can
show, create, update, enable, disable, and delete
policy entities of the service interconnection fabric: domains,
administrators, contracts, templates, services,
service-tokens, resources, zones, locations, links,
label-class-link, label-class-node. Also, the tool allows you to
perform the same operation on a batch of different policy entities.
Installing BWCTL-API
Ways to install
BWCTL-API tool comes already preinstalled on the fabric manager image available in AWS, Azure and GCP clouds.
To install BWCTL-API on your own Linux machine, you have first to install the Bayware repository on the machine and after that you can deploy the most recent version of the tool from the repository.
To add the repo, run the command (the command shown assumes you install the repo on a Debian machine):
]$ add-apt-repository 'deb https://s3-us-west-1.amazonaws.com/bayware-repo-devel/public/<specify_family_here>/ubuntu bionic main'
Note
BWCTL-API version must be from the same family as the other Bayware components in your service interconnection fabric, so use the right family version when installing repo. If BWCTL-API version is incompatible with the orchestrator, the tool will fail to establish a connection to orchestrator with an error message specifying the required family. The family is specified in the form of platform version and might look like 2.x or 3.x.
Installing BWCTL-API with apt on Debian/Ubuntu
Installing BWCTL-API on Debian/Ubuntu with apt provides isolation for the tool and its dependencies. Also, it’s easy to upgrade when a new version of BWCTL-API tool is released.
First, switch to root level access to install all packages as such:
]$ sudo su -
To install BWCTL-API on the machine with the Bayware repository already installed, run the command:
]# apt-get install bwctl-api
Verify that BWCTL-API installed correctly by running the command:
]# bwctl-api --version
bwctl-api/1.3.0
Upgrading BWCTL-API to the latest version
You can upgrade BWCTL-API tool already installed on your machine to the latest version in the family by running the command:
]# apt-get update
]# apt-get --only-upgrade install bwctl-api
Uninstalling BWCTL-API
If you need to uninstall BWCTL-API tool, run the command:
]# apt-get --purge remove bwctl-api
To exit from the current command prompt once you have completed installing, updating, or deleting BWCTL_API, run the command:
]# exit
Configuring BWCTL-API
Configuring BWCTL-API after installation
Before you can run BWCTL-API, you must configure the tool with your
orchestrator credentials. You store configuration locally in the file called
config.yaml located at:
~/.bwctl-api/config.yml
The file contains BWCTL-API credential details. To verify information in the configuration file, run the commands:
]$ cd .bwctl-api
~/.bwctl-api$ more config.yml
---
hostname: orchestrator-fab1.example.com
Domain: EXAMPLEDOMAIN
login: EXAMPLELOGIN
password: EXAMPLEPASSWORD
The hostname is an FQDN of the fabric orchestrator which you access with
BWCTL-API tool. The domain, login, and password are your credentials at the
orchestrator that determine what permissions you have for managing the service
interconnection fabric.
To run BWCTL-API commands you must have an account on the orchestrator with one
of the two administrative roles: systemAdmin or domainAdmin. See how to create
an administrator account in the documentation on orchestrator GUI.
Note
If you are configuring BWCTL-API on the fabric manager node, the credentials can be automatically retrieved when the orchestrator’s controller node created. For more information, see BWCTL CLI documentation.
Changing BWCTL-API configuration
If you need to change BWCTL-API configuration, update its configuration file stored locally at ~/.bwctl-api/config.yml.
Getting started with BWCTL-API
Typing the first command
To give a command in BWCTL-API, you will type bwctl-api along with the required input and press the <return> key.
To start using BWCTL-API tool, run the command:
]$ bwctl-api
Usage: bwctl-api [OPTIONS] COMMAND [ARGS]...

  Bayware CLI (Policy management)

Options:
  -v, --version  Print version and exit.
  -h, --help     Show this message and exit.

Commands:
  create   Create policy entity
  delete   Delete policy entity
  disable  Disable policy entity
  enable   Enable policy entity
  show     Show policy entity
  update   Update policy entity
The output above is the same as from running the command:
$ bwctl-api --help
Command Structure
- The command line is comprised of several components:
- bwctl-api,
- any options required by bwctl-api to execute the command,
- the command and, in most cases, subcommand,
- any arguments required by the command.
]$ bwctl-api --help
Usage: bwctl-api [OPTIONS] COMMAND [ARGS]...
Command Line Options
You can use the following command line options typing them on the command line immediately after bwctl-api:
- —version, -v
- A boolean switch that displays the current version of BWCTL-API tool.
- —help, -h
- A boolean switch that displays the commands available for execution.
You can finish the command line with the --help option following either command
or subcommand. The output will always give you a hint about what else you need
to type.
To see the help for the command, type the command only followed by --help and press <return>:
]$ bwctl-api show --help
Usage: bwctl-api show COMMAND [ARGS] [OPTIONS]

  To show policy entity, enter <command>.

Options:
  -h, --help  Show this message and exit.

Commands:
  administrator      Show administrator
  contract           Show contract
  domain             Show domain
  label-class-link   Show label class link
  label-class-node   Show label class node
  link               Show links
  location           Show location
  resource           Show resource
  service            Show service
  service-token      Show service token
  template           Show template
  zone               Show zone
To see the help for the subcommand, type the command followed by the subcommand and the --help and press <return>:
]$ bwctl-api show contract --help
Usage: bwctl-api show contract [OPTIONS] [CONTRACT@DOMAIN]

  To show contract, enter <contract>@<domain>. To show all contracts within
  a domain, use --domain <domain>.

Options:
  -d, --domain              Domain name.
  -c, --config-file         Path to configuration file.
  -o, --output-format       Output format: json or yaml.
  -h, --help                Show this message and exit.
Different commands support different options. Detail information on options find in the documentation section Using commands.
Commands
With BWCTL-API you can manage all policy entities in your service interconnection fabric. Each command includes the entity kind, as subcommand, and entity name, as argument. Some commands have the entity specification file as a mandatory argument.
BWCTL-API supports the following commands:
create KIND NAME [OPTIONS]
The command creates one or multiple entities. The specification file is mandatory for this command.
delete KIND NAME [OPTIONS]
The command deletes one or multiple entities. The specification file is mandatory for thebatchkind.
disable KIND NAME
The command disables a single entity.
enable KIND NAME
The command enables a single entity.
show KIND NAME [OPTIONS]
The command shows one or multiple entities. For some entity types, the entity name is optional in this command.
update KIND NAME [OPTIONS]
The command updates one or multiple entities. The specification file is mandatory for this command.
Kinds
The diagram below depicts the policy entities and relationships between them.
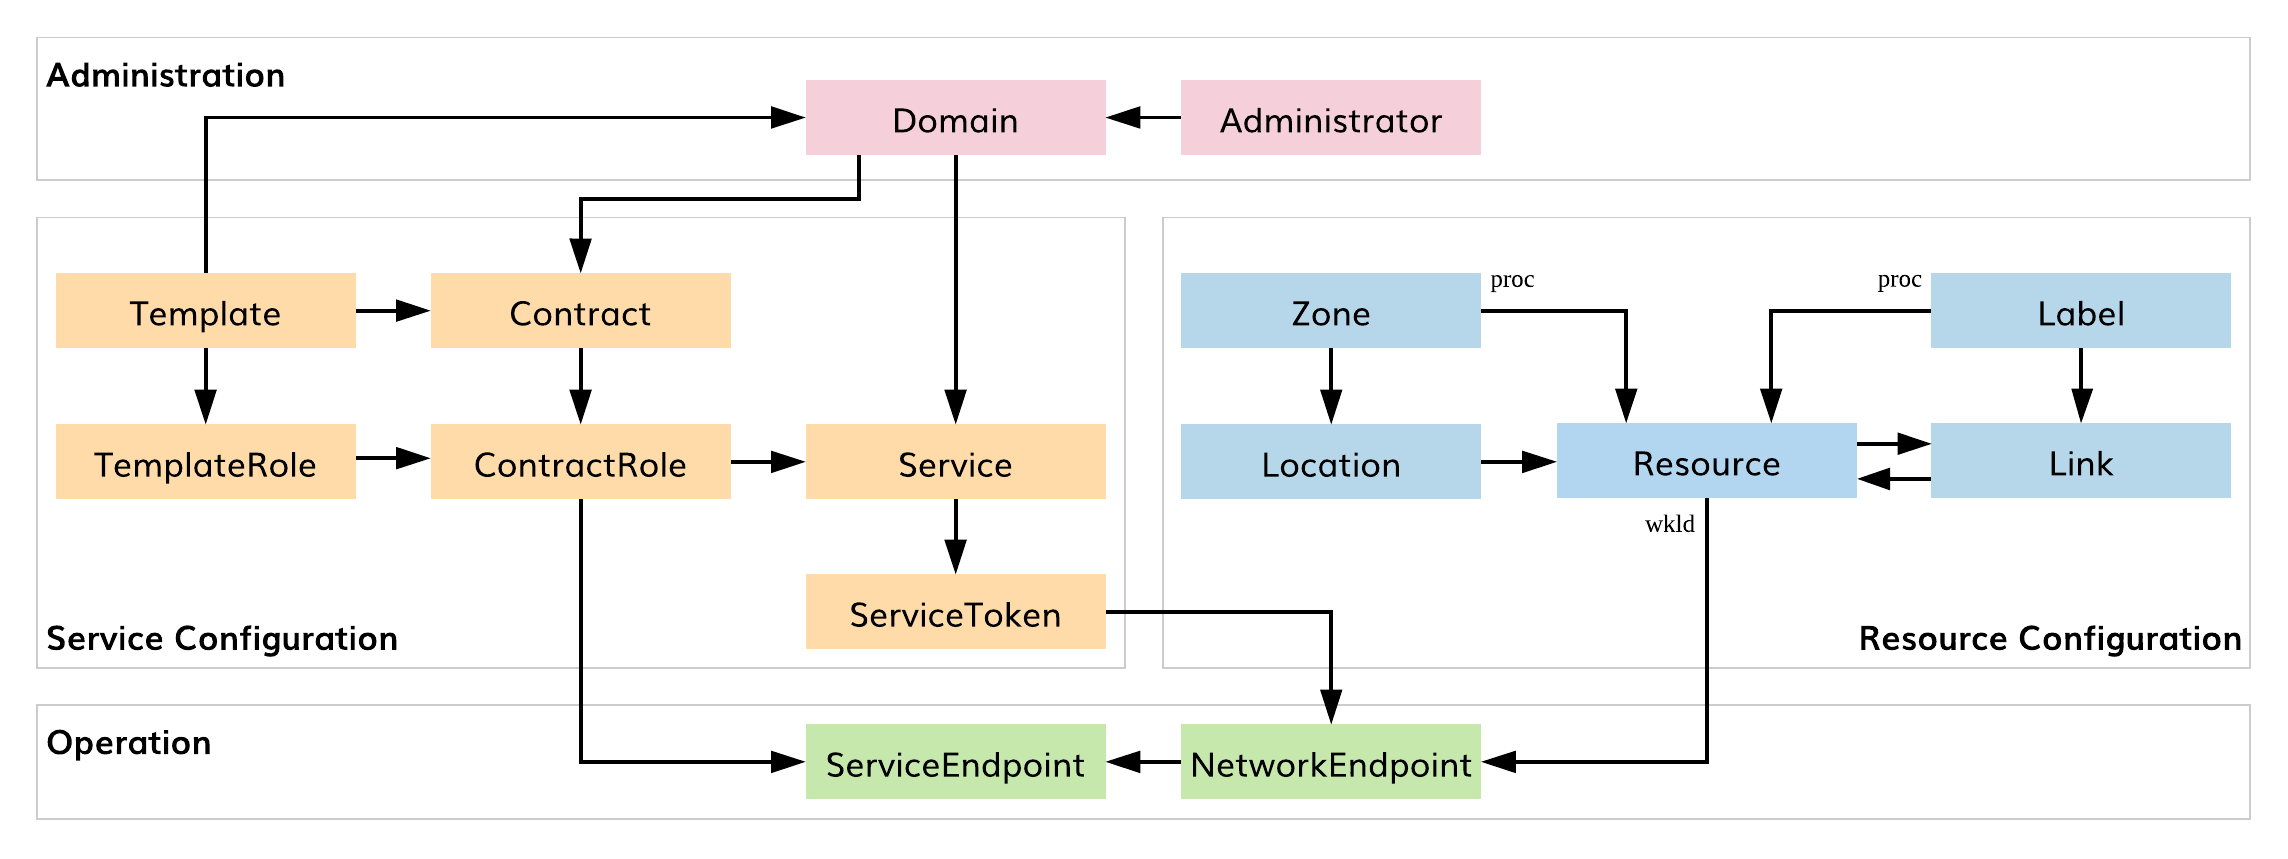
Fig. 164 Policy entity
To see the entity types you can run any command without subcommand:
]$ bwctl-api show
Usage: bwctl-api show [OPTIONS] COMMAND [ARGS]...

  Show policy entity commands

Options:
  -h, --help  Show this message and exit.

Commands:
  administrator     Show administrator
  contract          Show contract
  domain            Show domain
  label-class-link  Show label class link
  label-class-node  Show label class node
  link              Show link
  location          Show location
  resource          Show resource
  service           Show service
  service-token     Show service token
  template          Show template
  zone              Show zone
BWCTL-API manages the following entity types:
administrator NAME@DOMAIN
Theadministratorentity is an account of the service interconnection fabric administrator.
contract NAME@DOMAIN
Thecontractentity represents a communication microsegment for application services.
domain NAME
Thedomainentity serves as an administrative boundary between different portions of the service interconnection fabric.
link NAME
Thelinkentity represents a connection between the service interconnection fabric resources: workload node and processor node or between two processor nodes.
location NAME
Thelocationentity is an abstraction of the site where the workload nodes are deployed, e.g. cloud VPC or private datacenter.
resource NAME
Theresourceentity represents compute and network resources in the service interconnection fabric: a workload node with policy agent or a processor node with policy engine.
service NAME@DOMAIN
A set of applications, an individual application or an application microservice is represented in the policy model as theserviceentity.
service-token NAME@DOMAIN
Theservice-tokenentity is a service credential that defines the service access permissions to the communication microsegments.
template NAME
Thetemplateentity represents a predefined set of communication rules that can be used in contracts.
zone NAME
Thezoneentity is a service zone for processors, which bounds the processors to the workload nodes in one or multiple locations.
Batch
With BWCTL-API CLI, you can use a single batch command to manage a set of
entities of the same or different types. Below is an example of the command.
]$ bwctl-api create batch getaway-app.yml
Using Commands
Supported commands for each entity type
There are three groups of entities, each of which has its own set of commands.
- show, create, update, delete, enable, disable
This set of commands is applicable to the following types of entities:
- ADMINISTRATOR
- CONTRACT
- LINK
- SERVICE
- TEMPLATE
- show, create, update, delete
This set of commands is applicable to the following types of entities:
- DOMAIN
- LABEL-CLASS-LINK
- LABEL-CLASS-NODE
- LOCATION
- RESOURCE
- ZONE
- show, create, delete
This set of commands is applicable to the following types of entities:
- SERVICE-TOKEN
- create, update, delete
This set of commands is applicable to the following types of entities:
- BATCH
Managing Administrators
You can manage administrators using the following commands:
- show administrator [OPTIONS]
The command shows all administrators. You can use the options in this command as follows:
-d, --domaindomain name to show administrators within a domain only.-o, --output-formatoutput format, eitherjsonoryaml.-c, --config-filepath to configuration file.- show administrator NAME@DOMAIN [OPTIONS]
The command shows the administrator. You can use the options in this command as follows:
-d, --domaindomain name to show administrators within a domain only.-o, --output-formatoutput format, eitherjsonoryaml.-c, --config-filepath to configuration file.- create administrator NAME@DOMAIN [OPTIONS]
The command creates the administrator. The specification file is mandatory for this command.
-f, --filepath to the specification file.- update administrator NAME@DOMAIN [OPTIONS]
The command updates the administrator. You can use the specification file or the options in this command as follows:
-f, --filepath to the specification file.--descriptiondescription.-authadministrator authentication method, eitherlocalorldap(if both are allowed in the domain).-p, --passwordadministrator password.--roleadministrator role: systemAdmin or domainAdmin.--enabledadministrator account status: true or false.-c, --config-filepath to configuration file.- delete administrator NAME@DOMAIN
-c, --config-filepath to configuration file.- enable administrator NAME@DOMAIN
-c, --config-filepath to configuration file.- disable administrator NAME@DOMAIN
-c, --config-filepath to configuration file.
An example of the administrator specification file is shown below.
]$ cat administrator-spec.yml
---
apiVersion: policy.bayware.io/v2
kind: Administrator
metadata:
  username: admin
  user_domain: default
spec:
  is_active: true
  roles:
  - systemAdmin
  user_auth_method: LDAP
Managing Contracts
You can manage contracts using the following commands:
- show contract [OPTIONS]
The command shows all contracts. You can use the options in this command as follows:
-d, --domaindomain name to show contracts within a domain only.-o, --output-formatoutput format, eitherjsonoryaml.-c, --config-filepath to configuration file.- show contract NAME@DOMAIN [OPTIONS]
The command shows the contract. You can use the options in this command as follows:
-o, --output-formatoutput format for this command, eitherjsonoryaml.-c, --config-filepath to configuration file.-d, --domaindomain name to show contracts within a domain only.- create contract NAME@DOMAIN [OPTIONS]
The command creates the contract. The specification file is mandatory for this command.
-f, --filepath to the specification file.--descriptiondescription.--templatetemplate name.- update contract NAME@DOMAIN [OPTIONS]
The command updates the contract. You can use the specification file or the options in this command as follows:
-f, --filepath to the specification file.--descriptiondescription.
delete contract NAME@DOMAIN
-c, --config-filepath to configuration file.
enable contract NAME@DOMAIN
-c, --config-filepath to configuration file.
disable contract NAME@DOMAIN
-c, --config-filepath to configuration file.
An example of the contract specification file is shown below.
]$ cat contract-spec.yml
---
apiVersion: policy.bayware.io/v1
kind: Contract
metadata:
  name: frontend
  domain: getaway-app
spec:
  template: anycast-cross-all-vpcs
  contract_roles:
  - template_role: Originator
  - template_role: Responder
      ingress_rules:
      - protocol: icmp
      - protocol: tcp
        ports:
        - 8080
        - 5201
Managing Domains
You can manage domains using the following commands:
- show domain [OPTIONS]
The command shows all domains. You can use the options in this command as follows:
-o, --output-formatoutput format, eitherjsonoryaml.-c, --config-filepath to configuration file.- show domain NAME [OPTIONS]
The command shows the domain. You can use the options in this command as follows:
-o, --output-formatoutput format, eitherjsonoryaml.-c, --config-filepath to configuration file.- create domain NAME [OPTIONS]
The command creates the domain. The specification file is mandatory for this command.
-f, --filepath to the specification file.--descriptiondescription.--authdomain authentication method,localorldap(both can be allowed in the domain).-c, --config-filepath to configuration file.- update domain NAME [OPTIONS]
The command updates the domain. You can use the specification file or the options in this command as follows:
-f, --filepath to the specification file.--descriptiondescription.--authdomain authentication method,localorldap(both can be allowed in the domain).
delete domain NAME
-c, --config-filepath to configuration file.
An example of the domain specification file is shown below.
]$ cat domain-spec.yml
---
apiVersion: policy.bayware.io/v2
kind: Domain
metadata:
  domain: getaway-app
spec:
  auth_method:
  - LocalAuth
  domain_type: Application
Managing Labels
Two class types of managing labels.
Link Labels
You can manage Link labels using the following commands:
- show label-class-link [OPTIONS]
The command shows all label links. You can use the options in this command as follows:
-o, --output-formatoutput format, eitherjsonoryaml.- create label-class-link NAME [OPTIONS]
The command creates the link label. The specification file is mandatory for this command.
-f, --filepath to the specification file.--descriptionlabel class description.--class-id <class_identifier>label class identifier.--label-value-min <min_value>minimum value of link label.--label-value-max <max_value>maximum value of link label.- update label-class-link NAME [OPTIONS]
The command creates the label class link. The specification file is mandatory for this command.
-f, --filepath to the specification file.--descriptionlabel class description.--class-id <class_identifier>label class identifier.--label-value-min <min_value>minimum value of link label.--label-value-max <max_value>maximum value of link label.-a, --append <label_name>update an existing link label.-d, --delete <label_name>delete an existing link label.--label-value <value>label value.--label-description <description>label description.
delete label-class-link NAME [OPTIONS]
-c, --config-filepath to configuration file.
Node Labels
- show label-class-node [OPTIONS]
The command shows all label class nodes. You can use the options in this command as follows:
-o, --output-formatoutput format, eitherjsonoryaml.- create label-class-node [OPTIONS]
The command creates the label class node.
-f, --filepath to specification file.--descriptiondescription.--class-idlabel class identifier.--label-value-minminimum value of node.--label-value-maxmaximum value of node.- update label-class-node NAME [OPTIONS]
The command creates the label class node.
-f, --filepath to specification file.--descriptiondescription.--class-idlabel class identifier.--label-value-minminimum value of node.--label-value-maxmaximum value of node.-a, --appendupdate an existing node label.--label-valuelabel value.--label-descriptionlabel description.
delete label-class-node NAME [OPTIONS]
-c, --config-filepath to configuration file.
Managing Links
You can manage links using the following commands:
- show link [OPTIONS]
The command shows all links. You can use the options in this command as follows:
-o, --output-formatoutput format, eitherjsonoryaml.-c, --config-filepath to configuration file.- show link NAME [OPTIONS]
The command shows the link. You can use the options in this command as follows:
-o, --output-formatoutput format, eitherjsonoryaml.-c, --config-filepath to configuration file.- create link NAME [OPTIONS]
The command creates the link. The specification file is mandatory for this command.
-f, --filepath to the specification file.-c, --config-filepath to configuration file.--enabledlink administrative status: true or false.- update link NAME [OPTIONS]
The command updates the link. You can use the specification file or the options in this command as follows:
-f, --filepath to the specification file.--descriptiondescription.-c, --config-filepath to configuration file.--enabledlink administrative status: true or false.
delete link NAME
-c, --config-filepath to configuration file.
enable link NAME
-c, --config-filepath to configuration file.
disable link NAME
-c, --config-filepath to configuration file.
An example of the link specification file is shown below.
]$ cat link-spec.yml
---
apiVersion: policy.bayware.io/v2
kind: Link
metadata:
  name: <autogenerated>
spec:
  source_node: aws2-p01-fab1
  target_node: azr1-p01-fab1
  cost: 1
  admin_status: true
  ipsec_enable: true
  tunnel_ip_type: public
Managing Locations
You can manage locations using the following commands:
- show location [OPTIONS]
The command shows all locations. You can use the options in this command as follows:
-o, --output-formatoutput format, eitherjsonoryaml.-c, --config-filepath to configuration file.- show location NAME [OPTIONS]
The command shows the location. You can use the options in this command as follows:
-o, --output-formatoutput format, eitherjsonoryaml.-c, --config-filepath to configuration file.- create location NAME [OPTIONS]
The command creates the location. The specification file is mandatory for this command.
-f, --filepath to the specification file.-c, --config-filepath to configuration file.- update location NAME [OPTIONS]
The command updates the location. You can use the specification file or the options in this command as follows:
-f, --filepath to the specification file.-desc, --descriptiondescription.-c, --config-filepath to configuration file.
delete location NAME
-c, --config-filepath to configuration file.
An example of the location specification file is shown below.
]$ cat location-spec.yml
---
apiVersion: policy.bayware.io/v2
kind: Location
metadata:
  name: aws2
spec:
Managing Resources
You can manage resources using the following commands:
- show resource [OPTIONS]
The command shows all resources. You can use the options in this command as follows:
-o, --output-formatoutput format, eitherjsonoryaml.-c, --config-filepath to configuration file.- show resource NAME [OPTIONS]
The command shows the resource. You can use the options in this command as follows:
-o, --output-formatoutput format, eitherjsonoryaml.-c, --config-filepath to configuration file.- create resource NAME [OPTIONS]
The command creates the resource. The specification file is mandatory for this command.
-f, --filepath to the specification file.-c, --config-filepath to configuration file.- update resource NAME [OPTIONS]
The command updates the resource. You can use the specification file or the options in this command as follows:
-f, --filepath to the specification file.-desc, --descriptiondescription.
delete resource NAME
-c, --config-filepath to configuration file.
An example of the resource specification file is shown below.
]$ cat resource-spec.yml
---
kind: Resource
metadata:
  name: aws2-p01-fab1
spec:
  location: aws2
  node_type: processor
Managing Services
You can manage services using the following commands:
- show service [OPTIONS]
The command shows all services. You can use the options in this command as follows:
-d, --domaindomain name to show services within a domain only.-o, --output-formatoutput format, eitherjsonoryaml.-c, --config-filepath to configuration file.- show service NAME@DOMAIN [OPTIONS]
The command shows the service. You can use the options in this command as follows:
-o, --output-formatoutput format, eitherjsonoryaml.-c, --config-filepath to configuration file.-d, --domaindomain name to show services within a domain only.- create service NAME@DOMAIN [OPTIONS]
The command creates the service. The specification file is mandatory for this command.
-f, --filepath to the specification file.-c, --config-filepath to configuration file.--descriptiondescription.- update service NAME@DOMAIN [OPTIONS]
The command updates the service. You can use the specification file or the options in this command as follows:
-f, --filepath to the specification file.-desc, --descriptiondescription.-a, --appendadd contract role: <role_name:contract_name>.-d, --deletedelete contract role: <role_name:contract_name>.-c, --config-filepath to configuration file.
delete service NAME@DOMAIN
-c, --config-filepath to configuration file.
enable service NAME@DOMAIN
-c, --config-filepath to configuration file.
disable service NAME@DOMAIN
-c, --config-filepath to configuration file.
An example of the service specification file is shown below.
]$ cat service-spec.yml
---
apiVersion: policy.bayware.io/v2
kind: Service
metadata:
  name: http-proxy
  domain: getaway-app
spec:
  contract_roles:
  - contract: frontend
    contract_role: Originator
Managing Service Tokens
- show service-token SERVICE@DOMAIN [OPTIONS]
The command shows the service token. You can use the options in this command as follows:
-o, --output-formatoutput format, eitherjsonoryaml.-c, --config-filepath to configuration file.- create service-token SERVICE@DOMAIN [OPTIONS]
The command creates the service token. You can use the options in this command as follows:
-o, --output-formatoutput format, eitherjsonoryaml.-c, --config-filepath to configuration file.- delete service-token SERVICE@DOMAIN [OPTIONS]
The command deletes the service token. The following option is mandatory for this command:
--token-idtoken identifier.-c, --config-filepath to configuration file.
An example of the service token specification file is shown below.
]$ cat serviceToken-spec.yml
---
apiVersion: policy.bayware.io/v2
kind: Token
metadata:
  name: aws-proxy
spec:
  service: http-proxy
  domain: getaway-app
Managing Templates
You can manage templates using the following commands:
- show template [OPTIONS]
The command shows all templates. You can use the options in this command as follows:
-o, --output-formatoutput format, eitherjsonoryaml.-c, --config-filepath to configuration file.- show template NAME [OPTIONS]
The command shows the template. You can use the options in this command as follows:
-o, --output-formatoutput format, eitherjsonoryaml.-c, --config-filepath to configuration file.- create template NAME [OPTIONS]
The command creates the template. The specification file is mandatory for this command.
-f, --filepath to the specification file.-c, --config-filepath to configuration file.--descriptiondescription.- update template NAME [OPTIONS]
The command updates the template. You can use the specification file or the options in this command as follows:
-f, --filepath to the specification file.-desc, --descriptiondescription.-c, --config-filepath to configuration file.
delete template NAME
-c, --config-filepath to configuration file.
enable template NAME
-c, --config-filepath to configuration file.
disable template NAME
-c, --config-filepath to configuration file.
An example of the template specification file is shown below.
]$ cat template-spec.yml
---
apiVersion: policy.bayware.io/v2
kind: Template
metadata:
  name: multicast-cross-all-vpcs
spec:
  is_multicast: true
  orientation: directed
  roles:
  - name: Publisher
    code_binary: "409C470100E7846300E000EF0A500793C11C004000EF409C470500E7846300C000EF5795C11C004000EF409C00178713C0989002"
    propagation_interval_default: 5
    program_data_default:
      ppl: 0
      params:
      - name: hopCount
        value: 0
    code_map:
      Publisher: 0
    path_binary: "000000000001"
  - name: Subscriber
  code_binary: "409C470100E7846300C000EF5791C11C004000EF409C470500E7846300C000EF5791C11C004000EF409C00178713C0989002"
    propagation_interval_default: 5
    program_data_default:
      ppl: 0
      params:
      - name: hopCount
        value: 0
    code_map:
      Subscriber: 0
    path_binary: "000000000001"
Managing Zones
You can manage zones using the following commands:
- show zone [OPTIONS]
The command shows all zones in the fabric. You can use the options in this command as follows:
-o, --output-formatoutput format, eitherjsonoryaml.-c, --config-filepath to configuration file.- show zone NAME [OPTIONS]
The command shows the zone. You can use the options in this command as follows:
-o, --output-formatoutput format, eitherjsonoryaml.-c, --config-filepath to configuration file.- create zone NAME [OPTIONS]
The command creates the zone. The specification file is mandatory for this command.
-f, --filepath to the specification file.-c, --config-filepath to configuration file.--descriptiondescription.- update zone NAME [OPTIONS]
The command updates the zone. You can use the specification file or the options in this command as follows:
-f, --filepath to the specification file.-desc, --descriptiondescription.--tunnel-ipprocessor tunnel IP address: private or public.--ipsecprocessor IPsec status: true or false.--priorityprocessor priority: high or low.-a, --appendadd processor to zone: true or false.-d, --deletedelete processors from zone: processor name.-c, --config-filepath to configuration file.
delete zone NAME
-c, --config-filepath to configuration file.
An example of the zone specification file is shown below.
]$ cat zone-spec.yml
---
apiVersion: policy.bayware.io/v2
kind: Zone
metadata:
   name: AWS Zone
spec:
   locations:
   - name: aws2
     tunnel_ip_type: private
     ipsec_enable: true
Working with Batches
You can manage batches using the following commands:
- create batch [OPTIONS]
The command creates the batch. The specification file is mandatory for this command.
-f, --filepath to the specification file.-c, --config-filepath to configuration file.- update batch [OPTIONS]
The command updates the batch. The specification file is mandatory for this command.
-f, --filepath to the specification file.-c, --config-filepath to configuration file.- delete batch [OPTIONS]
The command deletes the batch. The specification file is mandatory for this command.
-f, --filepath to the specification file.-c, --config-filepath to configuration file.
An example of the batch specification file is shown below.
]$ cat batch-spec.yml
---
apiVersion: policy.bayware.io/v2
kind: Batch
metadata:
  name: getaway-app
spec:
- kind: Domain
  metadata:
  domain: getaway-app
spec:
  auth_method:
    - LocalAuth
  domain_type: Application
- kind: Contract
  metadata:
    name: frontend
    domain: getaway-app
spec:
    template: anycast-cross-all-vpcs
    contract_roles:
    - template_role: Originator
      endpoint_rules:
        ingress:
          - protocol: icmp
    - template_role: Responder
      endpoint_rules:
        ingress:
          - protocol: icmp
          - protocol: tcp
            ports:
              - 8080
              - 5201
- kind: Service
  metadata:
    name: http-proxy
    domain: getaway-app
spec:
    contract_roles:
    - contract: frontend
      contract_role: Originator
- kind: Service
  metadata:
    name: getaway-svc
    domain: getaway-app
spec:
    contract_roles:
    - contract: frontend
      contract_role: Responder